
Happy weekend to everyone! Since this weekend we will be celebrating my oldest boy’s eighth (Gasp!) birthday, I thought it was the perfect opportunity to have my sister Julie drop in for a guest post. She recently moved her oldest son and daughter into a shared room to make room for the new baby and after a lot of thought, planning, and work ended up with an adorable shared boy/girl room!
Take it away Julie!
When I finally came to the decision to have Ty and Maddie share a room, I had to go through a brief period of mourning for the rooms I had already spend so much thought and time and energy and money on. I really liked how each of their rooms turned out, and I think each of them liked their rooms as well. They got to have input and were a part in the process as well. Ty loved his blue rocket room:

And Maddie loved everything pink and flowery in her room:

But we really felt like it would be best for the two of them to share a room so the baby could have his own for the first little while. We knew the baby would be spending a lot of time sleeping, and not necessarily at the same times as the other kids. And Ty and Maddie have very similar sleep schedules right now, aside from Maddie's afternoon nap - but Ty is at school during that time anyway.
So, since Ty and Maddie each had their love for things blue, and things pink respectively, I wanted to figure out a way to accommodate each with out making the room feel too boy-ish, or too girly.
I knew I had to start by finding the right comforters for their beds. I looked, and looked and looked and looked for the right thing. It just wasn't coming to me. For some reason the creativity was seriously lacking when it came to getting this project started.
Finally I found the right thing. They were a bit pricey because they came from Pottery Barn, but once I found them I knew I could make a cute room that they each felt was their own.
Once I found the comforters, I could finally pick out paint colors. Green was in both of their bedding so I knew I wanted to use that as a common color to bring things together. I also wanted to do "board and batten" on the walls, which seems to be popular on the internet these days and which I have grown to really like. The final thing I wanted to do was paint the ceiling. I felt like it would make their room more fun.
So, I decided to use a light blue on the ceiling (like the sky) and a bright (but not lime) green on the walls, with white board and batten to complete it. Off to Bennetts Paint I went to purchase just the right colors.
I started on the ceiling with the blue. When I got it all up there I thought, "Oh dear, I've gone to dark. This is REALLY blue." I just wanted it to be subtle. But up against the already blue walls from Ty's room, I wasn't sure it was the right thing. I almost went right out and bought a new color.

But I decided to stick to my original instinct when I was picking out colors and decided to continue on with the green. I thought maybe it would look different once there wasn't so much blue on the walls to reflect off of.

I started with the green on the edges and then thought, "Oh no, this green is too bright, and the blue is too blue!" But, along with my little helper, we just kept on painting.

In the end, I was relieved to find that I thought the colors looked perfect! In fact, if you didn't know the ceiling was painted blue, you wouldn't even notice it right at first. It just adds a little more dimension and "fun" to the room. And the green is just the right shade, not to bright, but not to pastel either.

Next was on to the board and batten. Mine is actually "faux" board and batten since there is not actually board on the walls. First I painted the lower portion of the walls in a nice pure white in a semi-gloss finish. I also primed and painted the slats in the same color. For the slats I just used wooden lath that I picked up at Lowe's for about $13 for a bundle of 50. It was just the right height at about 4 feet so I didn't even have to cut it. I did cut one at 14 inches to use as my spacer between the boards. Then I just dabbed some liquid nails on the back of each one and taped them on the walls until the glue dried.

Some of the lath slats were a little bowed and didn't sit flush against the wall even with the glue, so we ended up borrowing Jaab's Dad's nail gun and some more glue to get them to lay flatter.

Then I topped it off with some 4 inch MDF. Finally I had to caulk all the seams along the top of the MDF and down both sides of each slat, and then touch up the paint over the caulk. It was a little tedious, but it was worth it because I think it turned out beautiful!

Finally we got it all together (two days before the baby was born - yes I was doing all this while 9 months pregnant!). The bunk beds went up and the new bedding was put on.
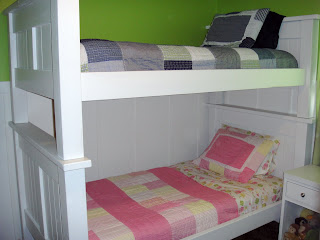
They each have their own special little night lights (or reading lights) we got from Ikea and they love them, along with their new bedding!


I also found this cute little table and chair online at Kohl's.com and only had to pay $30 for it. The chairs came white, but I thought it would be fun to paint them pink and blue for the kids.

So here are a few more shots of the finished bunk beds (because we put the guard rails and the ladder on after a few of the earlier pictures).


And of course their room hasn't been this clean and neat since! But I know that they love it, they have fun in it, they feel comfortable in it, and they each feel like it is their own, and that was my goal!
Thanks Julie for sharing your boy/girl shared room with us! I love how it shows both of their personalities without going to far in either direction. All the details and hard work really paid off to make a perfect solution to the often difficult task of joining a girly girl with a true blue boy!
Linked up with

No comments:
Post a Comment