Showing posts with label kids rooms. Show all posts

Monday, April 1, 2013

Changing it Up…The Evolution of a Little Boys Room {Picture Wall}


Good Morning! It’s Spring Break here and we are going to be spending a lot of time outside working in the yard (I can’t wait …. seriously it’s one of my favorite things!) and hopefully a lot less time on the computer. But before I head out I thought I would share the progress on Mason’s room. It’s been super slow progress but we’re getting there!

Since it’s been so long since I’ve updated his room, here is a picture of what we started with.

DSCN0095


We painted and switched out the furniture. (Remember, this used to be Daxon’s room and then they did a switcheroo.)

100_0766


Added some fun chevron fabric to lengthen the curtains and a memo wall.

2011-01-16 006


And here’s how it looks today. If you follow along on Facebook or Pinterest then you may recognize a couple of the changes. We found his new dresser on KSL (a local classified website), covered his lampshade and added a super fun picture wall. I drool!

100_0994


I mean seriously, giant pictures of my favorite eight year old, framed in rustic pine frames that didn’t break the bank! And bonus … they even graduate in stain color from dark to light. Like I said, I drool!

100_0995


I had the pictures printed off at Staples (they are engineer prints which only come in black and white on thin paper) for $13 bucks for four 24x36 pictures. Can’t beat that! Then I mounted them with spay adhesive on some 1/8” panel board for stability (you really could use anything, we just had some laying around and figured it would work). Once they were mounted on the panel board, I thought it would be nice to protect them with a finish of some sort, so I sprayed one of the pictures with a spray poly. DO NOT DO THIS!!! It totally bubbled the picture. So, I just left the rest alone and figured they were cheap enough that they could be replaced as needed.

For the frames I used this tutorial from Young House Love. They were fairly simple and to make and way cheaper than going out and buying four huge frames.

100_0996


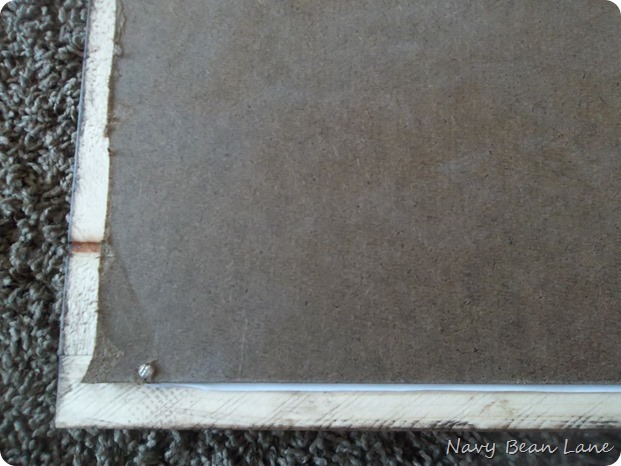
Once they were built, stained, and poly-ed, it was time to attach the pictures to the frames by nailing them right into the back of the frames. Easy Peasy!
100_0979


I then attached the hanging hardware. I used two large picture hangers per picture and nailed them right into the top of each frame.

100_0977


I ended up having to bend the picture hangers a bit before nailing them on because if not they were flush with the panel board and wouldn’t be able to catch the screw when I hung them.

100_0980


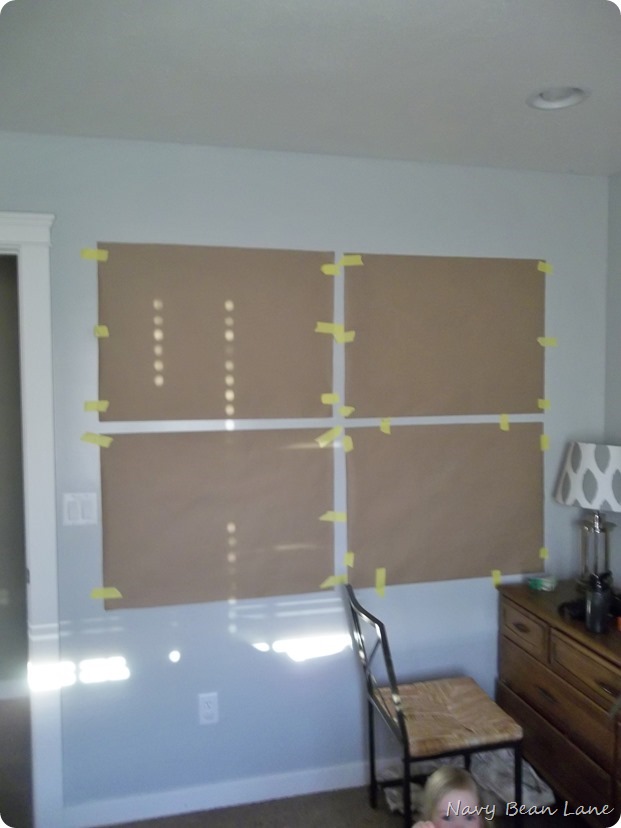
Once they were ready to hang I traced each frame onto some brown paper, making sure to mark on each paper exactly where the nail goes. Then I taped the papers up on the wall exactly where I wanted the pictures hung and nailed a small nail into each spot that I has previously marked.
100_0981


Then, I took one sheet of paper down at a time (leaving the nails in the wall). If I was hanging something light I could have just hung them at this point, but I chose to use wall anchors so that my pictures were nice and sturdy. I then took the nails out and installed the wall anchors in their place and then hung the frames.

100_0983


I couldn’t be happier with the results and may have sat on the bed and stared at them for, um … awhile after I was done!

100_0994


And just because I seem to stay motivated with a list, here is a list of things to still be done! Heaven help me finish this up soon!

Mason’s Room

Paint

lengthen curtains

new dresser

memo wall

plank the desk wall

desk/chair

accessories

headboard

Trophy Organization

Desk Lighting

Art/Pictures on wall

*Bed skirt

*Cover Lamp Shade


Kristin


Linked Up:
Thrifty Decor Chick, Evolution of Style, Lolly Jane (The Scoop),Savvy Southern Style,Not Just a Housewife, The House of Smiths, Somewhat Simple, Living Well Spending Less, Six Sisters Stuff, Tatertots & Jello

Thursday, February 7, 2013

Changing it Up … The Evolution of a Little Boys Room {Curtains}


If you follow me on Facebook, then you know that I’ve been working on the curtains for Mason’s room. It’s really quite a small change that makes a big difference in the look of the room.

If you are having a hard time remembering … here’s a look at what his room looked like before. Just remember it’s a work in progress :)

100_0768


This is how the room looks now. I moved the curtain rod up a good six inches to make the room feel a little taller. I’m not sure why I ever hung them any lower … maybe to fit the curtain panels as they were!? LAZY! Then I just added a band of gray and white chevron fabric to the bottom of each panel so that they went to the floor. I don’t know about you, but I am extremely anti high-water curtains, so this simple fix did the trick!


100_0880


I love having a new pattern introduced in the room. Even though it’s a small amount … and pretty neutral, it’s still a pattern, so I will go ahead and give myself a pat on the back for that! (If you know me you know I have a hard time adding in pattern … weird, I know.)


100_0884


Here’s another look at the progress on the other side of the room. I’m wanting to start on the desk area next (it will be in the empty space to the left of the closet). But first I have to decide whether I should do white or stained planking on the wall. What do you think? I have always pictured it stained, but am feeling like the room is getting a little dark with the dark bedding and curtains. What to do, what to do!


100_0883


Slowly but surely we are making progress. Here is a run down of what still needs to be done. I’m hoping to have it done by the end of the month so I can move onto something else … we shall see!!!

Mason’s Room

Paint

lengthen curtains

new dresser

memo wall

plank the desk wall

desk/chair

accessories

headboard

Trophy Organization

Desk Lighting

Art/Pictures on wall

*Bed skirt


Hope you all are having a great week!

Kristin


Linked Up:
Thrifty Décor Chick

Thursday, January 17, 2013

Changing it Up … The Evolution of a Little Boys Room {Memo Wall}


As I mentioned here I am on a mission to finish up Mason’s bedroom. Mason is 8 and he is a bit of a collector. He loves to display his stuff around his room and does so by either pinning or taping said “stuff” to his wall. When I noticed this happening more frequently I knew it was time for an area to be designated just for that. I came up with a cheap and simple solution … meet Mason’s memo wall!

100_0858


It started out as a boring, empty wall that was just that! Boring and empty!

100_0760


I knew that I wanted the wall filled up but didn’t want to spend much on the project so I shopped my collection of old frames and came up with a few different sizes to fill the space. In order to see how they would fit in the space, I laid them out on the floor in front of the wall and tried a few arrangements until deciding on this one below.

100_0762


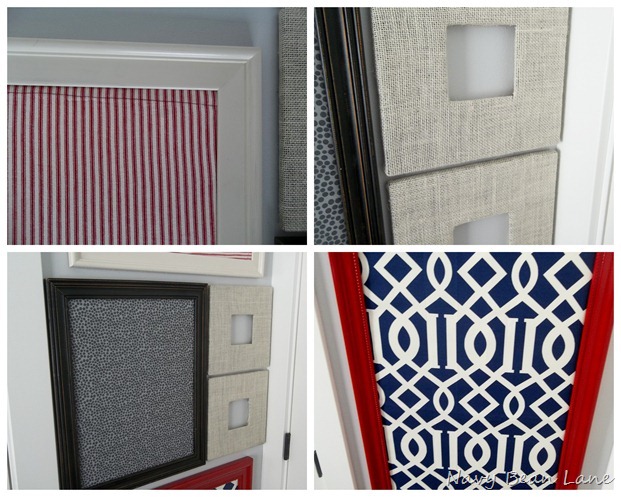
If you have been following NBLane for awhile you may (or may not) remember this post where I spray painted a few thrift store finds. The framed puzzle on the right is now the bright red frame being used for the memo wall and the display shelf on the left got a fresh coat of white and will be finding it’s way into the room soon!DSC02775


As for the other frames I just left the two big ones as is, removed the glass, cut a piece of cardboard to fit in each frame and covered the cardboard with some leftover blanket filler and some fabric scraps I had laying around. It was easy peasy. And they are just duck taped on the back to hold everything together. Told ya … easy!

100_0860


Can you see the red line that is stitched across the red and white striped fabric? That fabric is actually an old pillow case from Mason’s room when he was a baby. I like how the stitching tells a story and love reusing something from his old room!

The two small square frames are old Ikea mirrors that I took the mirror out of and covered with burlap. I love the texture that the burlap brings to the wall.

2011-01-16 003


Mason is loving having a designated wall to showcase all his drawings and memo’s. He has put it to good use and I haven’t seen any tape lurking on the walls so I think it was a win!

100_0867


It feels good to have something crossed off the list and I think it’s just what I needed to get the ball rolling!

Oh, and by the way … it’s almost the weekend! Now if I could just get everyone healthy around here so we can enjoy it!

Kristin


Linking up at:
Savvy Southern Style
Somewhat Simple
tatertots & jello
Thrifty Decor Chick
Not Just a Housewife

Thursday, January 10, 2013

Changing it Up … The Evolution of a Little Boys Room


Ok, is it just me or are there some awful bugs going around this winter? This is the second time I’ve been sick in a month and I’m not talking just a little cold here. It’s rough. I can see many loads of sheets in my near future as it makes its way through everyone. Blah!

Anyway, I was sitting here looking through my pictures and realized that I haven’t shown the changes that we’ve made in Mason’s room … um … AWHILE back! It is still a work in progress (you know I can throw some paint on the wall any old day but when it comes to details I freeze!)

Here’s what we started with. (they are the only pics I had of the “before” …) I had a hard time painting over those stripes. They were a labor of love, but when we did a room swap this room went from Daxon’s room to Mason’s room and the colors didn’t work with Mason’s bedding. Anyway, you get the idea. It was time to paint!


DSCN0095


DSC02270


DSC02271


I like to let my kids be involved in the whole process of decorating their rooms. It helps them to feel like it is their space instead of a space decorated by mom that they have no choice but to live in. I asked Mase his opinion on paint colors and his only request was dark blue. It’s his favorite color so we went with it. We ended up doing gray with bold blue stripes. I really love how much more grown up it is. It will be a room that can grow with him and still feels young at the same time. If you look close you will find a hint or two on an upcoming addition to the room!


100_0763


I have plans to make the little area to the left of the closet into a cozy homework spot complete with a desk. I can’t wait to finally make some good use of this wasted space!


100_0764


100_0768


So far we have painted and thrown his furniture in without a lot of thought. It’s made a huge difference but now it’s time to move onto the fun stuff. The stuff that will finish it off, the stuff that will make his room feel like HIS room.


100_0766


I have some ideas, and since we all know how I follow through, I am making a list to keep me accountable. It would just be nice to have one room completed. You know? Instead of bouncing from room to room?

Mason’s Room

Paint

lengthen curtains

new dresser

memo wall

plank the desk wall

desk/chair

accessories

headboard

Trophy Organization

Desk Lighting

Art/Pictures on wall


I will be keeping you updated on the progress … and trying extra hard to wrap it up in a timely fashion (no promises though Winking smile).

How about you? Anyone else starting out the new year with a list?


Kristin


Wednesday, August 29, 2012

Tour the Lane {Boys Shared Bedroom}


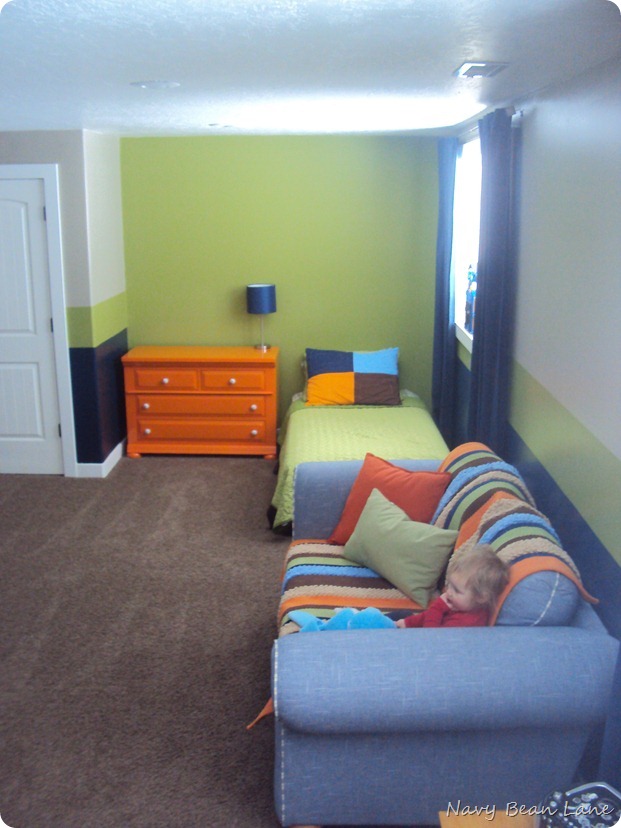
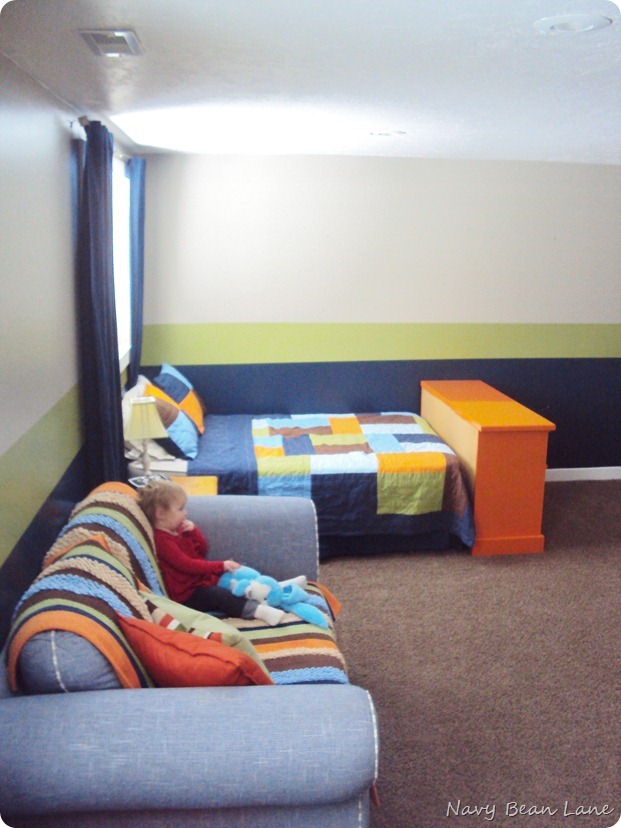
Today I thought I would share G and D’s shared room. We finished one giant bedroom down in the basement (It was meant to be two rooms but we opted for one big one instead) and it is the perfect spot for the two little boys to share.

At this point it has good bones, is painted and has all the functional pieces that we need, but for some reason I always seem to get stuck here. I don’t know why I have such a hard time with putting things up on the walls, but I do. I have a few ideas of what I want to do though and I’ll keep ya posted of any changes!

This is a look into the room from the doorway. I could only get half of the room in each shot, so hopefully you will get the full picture of it as you check out the rest of the pictures.

DSC02558


I took this shot before the hardware was painted for this dresser, but look here to see where I posted the finished look.

DSC02559


Don’t mind the little miss watching TV! She is my little shadow and ends up in lots of random shots!

DSC02565


DSC02566


DSC02564


I love having these Ikea shelves for toy storage. I’m thinking about doing something to line the back of them, maybe with fabric or wrapping paper or good ol’ paint.

DSC02570


I’m not a big lover of TV's in kids rooms, but the kids usually have a movie night together on the weekends and this was the perfect spot. Then they can watch their movie downstairs while the hubby and I can enjoy one together upstairs. It works for us.

DSC02575


The couch was a hand me down from Grandma and I just threw a couple soft rugs on top to update it a bit and tie it into the room.

DSC02576


All in all I am really happy with their room and am excited to start adding some of the fun finishing touches that I know will make it feel complete.


Linking up at:
Thrifty Decor Chick

Saturday, May 19, 2012

Boy/Girl Shared Bedroom {Guest Post}


Happy weekend to everyone! Since this weekend we will be celebrating my oldest boy’s eighth (Gasp!) birthday, I thought it was the perfect opportunity to have my sister Julie drop in for a guest post. She recently moved her oldest son and daughter into a shared room to make room for the new baby and after a lot of thought, planning, and work ended up with an adorable shared boy/girl room!

Take it away Julie!

When I finally came to the decision to have Ty and Maddie share a room, I had to go through a brief period of mourning for the rooms I had already spend so much thought and time and energy and money on. I really liked how each of their rooms turned out, and I think each of them liked their rooms as well. They got to have input and were a part in the process as well. Ty loved his blue rocket room:

And Maddie loved everything pink and flowery in her room:

But we really felt like it would be best for the two of them to share a room so the baby could have his own for the first little while. We knew the baby would be spending a lot of time sleeping, and not necessarily at the same times as the other kids. And Ty and Maddie have very similar sleep schedules right now, aside from Maddie's afternoon nap - but Ty is at school during that time anyway.

So, since Ty and Maddie each had their love for things blue, and things pink respectively, I wanted to figure out a way to accommodate each with out making the room feel too boy-ish, or too girly.

I knew I had to start by finding the right comforters for their beds. I looked, and looked and looked and looked for the right thing. It just wasn't coming to me. For some reason the creativity was seriously lacking when it came to getting this project started.

Finally I found the right thing. They were a bit pricey because they came from Pottery Barn, but once I found them I knew I could make a cute room that they each felt was their own.

Once I found the comforters, I could finally pick out paint colors. Green was in both of their bedding so I knew I wanted to use that as a common color to bring things together. I also wanted to do "board and batten" on the walls, which seems to be popular on the internet these days and which I have grown to really like. The final thing I wanted to do was paint the ceiling. I felt like it would make their room more fun.

So, I decided to use a light blue on the ceiling (like the sky) and a bright (but not lime) green on the walls, with white board and batten to complete it. Off to Bennetts Paint I went to purchase just the right colors.

I started on the ceiling with the blue. When I got it all up there I thought, "Oh dear, I've gone to dark. This is REALLY blue." I just wanted it to be subtle. But up against the already blue walls from Ty's room, I wasn't sure it was the right thing. I almost went right out and bought a new color.

But I decided to stick to my original instinct when I was picking out colors and decided to continue on with the green. I thought maybe it would look different once there wasn't so much blue on the walls to reflect off of.

 I started with the green on the edges and then thought, "Oh no, this green is too bright, and the blue is too blue!" But, along with my little helper, we just kept on painting.

In the end, I was relieved to find that I thought the colors looked perfect! In fact, if you didn't know the ceiling was painted blue, you wouldn't even notice it right at first. It just adds a little more dimension and "fun" to the room. And the green is just the right shade, not to bright, but not to pastel either.

Next was on to the board and batten. Mine is actually "faux" board and batten since there is not actually board on the walls. First I painted the lower portion of the walls in a nice pure white in a semi-gloss finish. I also primed and painted the slats in the same color. For the slats I just used wooden lath that I picked up at Lowe's for about $13 for a bundle of 50. It was just the right height at about 4 feet so I didn't even have to cut it. I did cut one at 14 inches to use as my spacer between the boards. Then I just dabbed some liquid nails on the back of each one and taped them on the walls until the glue dried.

Some of the lath slats were a little bowed and didn't sit flush against the wall even with the glue, so we ended up borrowing Jaab's Dad's nail gun and some more glue to get them to lay flatter.

Then I topped it off with some 4 inch MDF. Finally I had to caulk all the seams along the top of the MDF and down both sides of each slat, and then touch up the paint over the caulk. It was a little tedious, but it was worth it because I think it turned out beautiful!

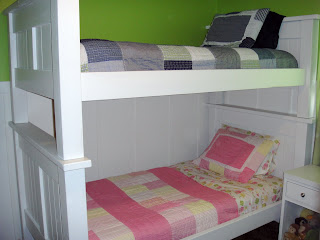
Finally we got it all together (two days before the baby was born - yes I was doing all this while 9 months pregnant!). The bunk beds went up and the new bedding was put on.

They each have their own special little night lights (or reading lights) we got from Ikea and they love them, along with their new bedding!

I also found this cute little table and chair online at Kohl's.com and only had to pay $30 for it. The chairs came white, but I thought it would be fun to paint them pink and blue for the kids.

So here are a few more shots of the finished bunk beds (because we put the guard rails and the ladder on after a few of the earlier pictures).


And of course their room hasn't been this clean and neat since! But I know that they love it, they have fun in it, they feel comfortable in it, and they each feel like it is their own, and that was my goal!


Thanks Julie for sharing your boy/girl shared room with us! I love how it shows both of their personalities without going to far in either direction. All the details and hard work really paid off to make a perfect solution to the often difficult task of joining a girly girl with a true blue boy!


Linked up with


Thrifty Decor Chick