Showing posts with label projects. Show all posts

Monday, May 27, 2013

Entertainment Center Before & After


Happy Memorial Day! We have been working a lot in the yard this weekend and are getting closer to finishing up the sprinklers in our front yard flower beds! (I’m pretty sure that was supposed to be my Mother’s day present at least one of the 6 years we have lived here … ha!) We have also been having fun spending time with family, going out to eat, and having a campfire (smores … yum!) in the backyard. The weather has been perfect and we are really just soaking it all up!


I also finished up this gem that I have been slowly working on for the past year! Remember way back in March of 2012 my mom and I started redoing her house?? Well, we found what we think was an old shoe shiners bench during our all day thrifting marathon and picked it up with the intent of turning into their new entertainment center.


I am beyond giddy with the results and am kind of wishing it was mine!

100_1044


Just to refresh your memory, this is how she looked when we picked it up back in March 2012. Pretty, right?!

DSC02840


Then it sat … for months, until we decided to get working. We removed the old top and added some pine 1 x 2’s to beef it up and get it ready for a new top. I swear the kids love helping!

IMG_20130107_175226


Before adding the new top I did a few alternating layers of a white and gray wash on the base. (Sorry, I didn’t get any pics!)

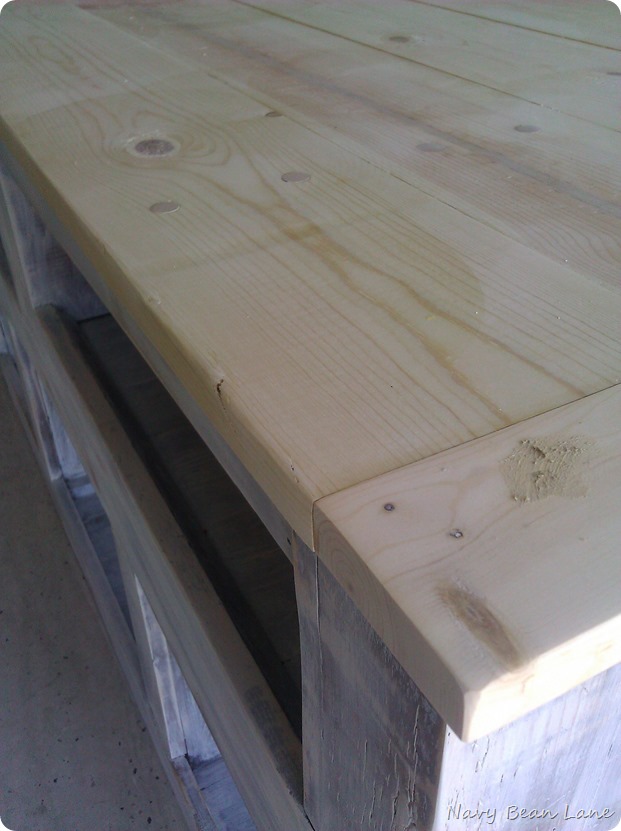
Once the painting was done we added the top which was just pine 1X5’s capped on each end with a 1X3. To hide the screws we countersunk them and then added 1/2” wood plugs. I love the extra bit of character that they add!
IMG_20130504_122932


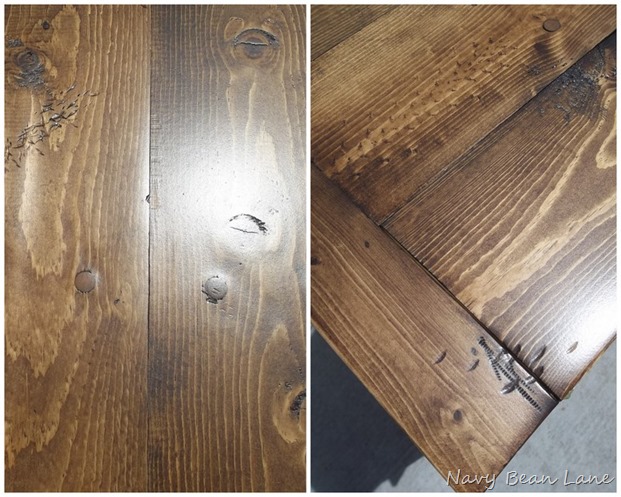
We found that even after choosing the straightest boards we could find, the top was still going to need some major sanding to smooth it all out. Thank goodness for electric sanders! I sanded the crap out of that thing until it was smooooth and then it was time for a little distressing! I just used whatever I could find around the garage; a hammer (both sides), a screw, a drill bit.

IMG_20130504_123148


After sanding, distressing, and staining, this is what the top looked like.
2011-01-16 013


Once the top was on and stained I felt like the base needed a little more character, so I took the electric sander to it and exposed a little of the wood underneath the white wash.

Here is is after sanding.

100_1029


Then I mixed up a glaze and applied it with a cheapo brush.

100_1033


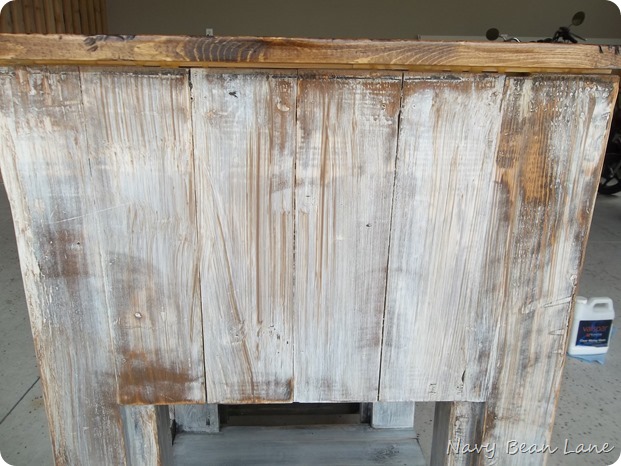
Here is how it looked with the stain/glaze brushed on.
100_1030


And then after wiping it back off. It’s not a huge difference, but it just adds one more layer and a little more depth.

100_1032


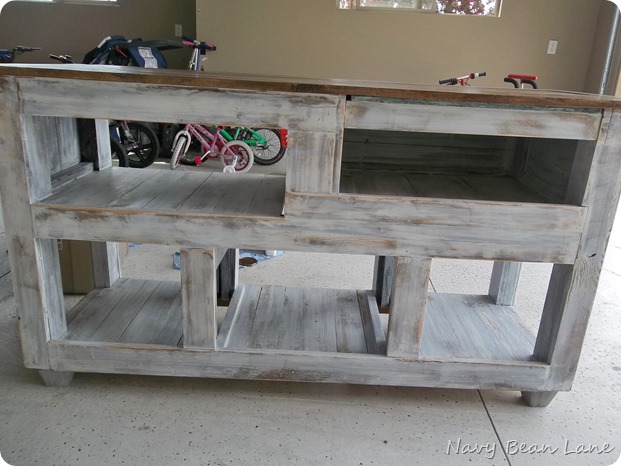
Here is the whole thing after sanding (but before glazing) and adding some new feet. After this step we added a small piece of trim right under the new top to cover a few gaps and finish off the look.
100_1028


The final step was to seal it. We used Varathane polyurethane in a satin finish.

100_1042


And just because I can’t get enough … here are a few more shots of the finished product!

100_1044


100_1050


100_1049


100_1052


100_1057


100_1047


Now I’m off to enjoy what’s left of this glorious, long Memorial weekend! I hope you are too!


Kristin


Linked up here:
Lolly Jane(The Scoop), My Uncommon Slice of Suburbia, Not Just a Housewife, Thrifty Décor Chick

Friday, March 8, 2013

Baby Doll Bunk Bed


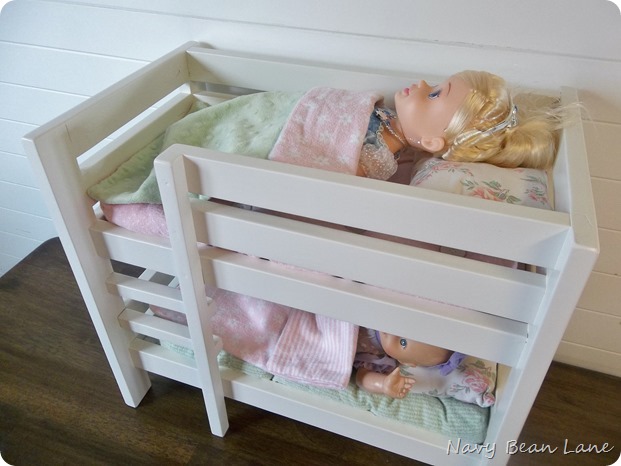
If you follow along on Instagram or Facebook you may have seen a sneak peek or two at the doll bunk beds that we made for Navi’s birthday. (follow along on Instagram! @navybeanlane for random updates and sneak peeks of my latest projects!) And when I say we, it was a total collaboration with Kasey’s Grandpa building them, Kasey painting them, and me sewing all the bedding.

I am so so happy with the outcome!

 100_0955


We decided to go with Benjamin Moore White Dove for the paint, 1- because we had extra from a previous cabinet job (can’t  beat free paint!), and 2- because I wanted it to go with whatever changes happen in her room over the years so white was the natural choice.


100_0957


The bedding was made out of Navi’s old receiving blankets and the fabric for the pillows was cut from her old crib sheet. I love how it gives another life to her baby linens and also ties into her room perfectly!


100_0958


I absolutely love the sentimental meaning in that Navi used to sleep on the very sheet that her babies now do! Gah! I just want to eat her up … why oh why do they have to grow up?


IMG_6096


Back to the bunk bed … I got the plans from Ana White. Have you checked out her site? She is AMAZING! The bed is made to fit an American Girl doll, so it’s a pretty good size. Often times Navi will double or triple them up and have 4-6 doll sleeping comfortably! :) There is also a tutorial on her sight for the bedding and pillows. Don’t be scared to make it … if I can do it, then trust me so can you!


100_0962


Navi loves to give her babies kisses and tuck them into their new beds and I love watching her be a little mama! Really, how is she this big!?!


100_0966


Anyone doing any DIY this weekend? I will be working on wrapping up a couple of projects for Mason’s room that I can’t wait to show you next week! (And yes, I’m aware that my goal was to be DONE by the first of March … for some reason or another things always seem to take longer than I expect around here! Oh well, such is life!)

Kristin


Linked Up At:
Sassy Little Lady,Tatertots & Jello, Six Sisters Stuff, Not Just a Housewife, Lolly Jane (The Scoop), Savvy Southern Style, Somewhat Simple

Thursday, February 7, 2013

Changing it Up … The Evolution of a Little Boys Room {Curtains}


If you follow me on Facebook, then you know that I’ve been working on the curtains for Mason’s room. It’s really quite a small change that makes a big difference in the look of the room.

If you are having a hard time remembering … here’s a look at what his room looked like before. Just remember it’s a work in progress :)

100_0768


This is how the room looks now. I moved the curtain rod up a good six inches to make the room feel a little taller. I’m not sure why I ever hung them any lower … maybe to fit the curtain panels as they were!? LAZY! Then I just added a band of gray and white chevron fabric to the bottom of each panel so that they went to the floor. I don’t know about you, but I am extremely anti high-water curtains, so this simple fix did the trick!


100_0880


I love having a new pattern introduced in the room. Even though it’s a small amount … and pretty neutral, it’s still a pattern, so I will go ahead and give myself a pat on the back for that! (If you know me you know I have a hard time adding in pattern … weird, I know.)


100_0884


Here’s another look at the progress on the other side of the room. I’m wanting to start on the desk area next (it will be in the empty space to the left of the closet). But first I have to decide whether I should do white or stained planking on the wall. What do you think? I have always pictured it stained, but am feeling like the room is getting a little dark with the dark bedding and curtains. What to do, what to do!


100_0883


Slowly but surely we are making progress. Here is a run down of what still needs to be done. I’m hoping to have it done by the end of the month so I can move onto something else … we shall see!!!

Mason’s Room

Paint

lengthen curtains

new dresser

memo wall

plank the desk wall

desk/chair

accessories

headboard

Trophy Organization

Desk Lighting

Art/Pictures on wall

*Bed skirt


Hope you all are having a great week!

Kristin


Linked Up:
Thrifty Décor Chick

Thursday, January 17, 2013

Changing it Up … The Evolution of a Little Boys Room {Memo Wall}


As I mentioned here I am on a mission to finish up Mason’s bedroom. Mason is 8 and he is a bit of a collector. He loves to display his stuff around his room and does so by either pinning or taping said “stuff” to his wall. When I noticed this happening more frequently I knew it was time for an area to be designated just for that. I came up with a cheap and simple solution … meet Mason’s memo wall!

100_0858


It started out as a boring, empty wall that was just that! Boring and empty!

100_0760


I knew that I wanted the wall filled up but didn’t want to spend much on the project so I shopped my collection of old frames and came up with a few different sizes to fill the space. In order to see how they would fit in the space, I laid them out on the floor in front of the wall and tried a few arrangements until deciding on this one below.

100_0762


If you have been following NBLane for awhile you may (or may not) remember this post where I spray painted a few thrift store finds. The framed puzzle on the right is now the bright red frame being used for the memo wall and the display shelf on the left got a fresh coat of white and will be finding it’s way into the room soon!DSC02775


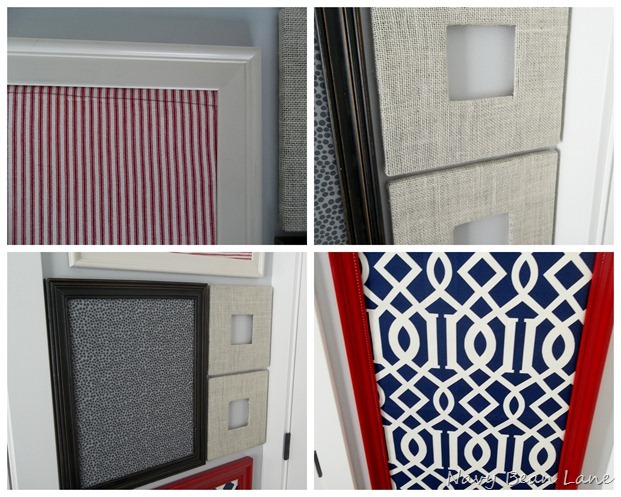
As for the other frames I just left the two big ones as is, removed the glass, cut a piece of cardboard to fit in each frame and covered the cardboard with some leftover blanket filler and some fabric scraps I had laying around. It was easy peasy. And they are just duck taped on the back to hold everything together. Told ya … easy!

100_0860


Can you see the red line that is stitched across the red and white striped fabric? That fabric is actually an old pillow case from Mason’s room when he was a baby. I like how the stitching tells a story and love reusing something from his old room!

The two small square frames are old Ikea mirrors that I took the mirror out of and covered with burlap. I love the texture that the burlap brings to the wall.

2011-01-16 003


Mason is loving having a designated wall to showcase all his drawings and memo’s. He has put it to good use and I haven’t seen any tape lurking on the walls so I think it was a win!

100_0867


It feels good to have something crossed off the list and I think it’s just what I needed to get the ball rolling!

Oh, and by the way … it’s almost the weekend! Now if I could just get everyone healthy around here so we can enjoy it!

Kristin


Linking up at:
Savvy Southern Style
Somewhat Simple
tatertots & jello
Thrifty Decor Chick
Not Just a Housewife

Monday, October 29, 2012

Adventures in Pinland {Fridge Coasters}


Have you guys seen this floating around on Pinterest? It’s been showing up as I browse for quite some time now and I love how a simple thing like a “fridge coaster” can amp up the look and clean-ability of your fridge in a matter of minutes! The folks over at It’s An Organized Chaos used a plastic place mat from Target to line their fridge shelves. (brilliant right!?!)

fridgecoaster

Source


My fridge was in desperate need of a little tlc. You know, a good thorough cleaning (as in take EVERYTHING out, throw half of it away because, yes, it had been that long and was THAT bad!), and then a good scrub down. I figured what better time than now to throw in a simple fridge coaster and I’m so glad I did!

100_0661


I went to Target looking for some plastic placemats, and they had a few but nothing that I loved so … it was on to plan B. Shelf Liners. I bought two rolls (4.99 each) and for 10 bucks and a few minutes of my time I had a newly beautified fridge!

100_0662


100_0663


100_0664


I have to say that after the liners were in and everything was put away I was pleasantly surprised every time I opened up the fridge! It’s funny how excited I get about things like this but I would literally open up the fridge just to take a peek and closed it every time with a smile on my face!

100_0667


Here’s a side by side for comparisons sake. It’s so much better, right? And, honestly I can’t wait to clean it out again just to see if the coasters make it any easier. I’m thinking it will, but time will tell!

2012-10-24 001


All in all this pin was an absolute win! It was an easy, cheap addition to the fridge that I only wish I had done sooner! It makes me want to attack the pantry … hopefully sooner than later!

Have a fun Halloween week! We are off to a Halloween party for D’s preschool and then I’m starting on another set of kitchen cabinets this week! It’s going to be super busy but I can’t wait!


Kristin

Monday, October 8, 2012

“Pinteresting” News on the Lane


Happy Monday all! How was your weekend? Mine was pretty great considering I got to go check World Market out for the first time … EVER! I know, I know, I’m a little (or a lot ) late on the World Market bandwagon, but boy oh boy am I glad I jumped on! What a fun store! (And a whole other post in and of itself!)

Ok, now that I got that excitement out, let’s talk Pinterest. It’s awesome. It’s fun. All the cool kids are doing it (HA). It fills my mind with endless thoughts and ideas. It at times can make me a little depressed. It is oh so addicting. And I’ve been thinking to myself … self, you sure do pin a lot of fun,creative and downright delicious looking things with good intentions of trying them, but for one reason or another it just never seems to happen. And instead of trying out something that I have pinned, I find myself just pinning more and more until I have so many ideas floating around that I can’t focus on just one.

So with all of this came an idea to start what I am calling Adventures in Pinland. It’s basically motivation for me to get some crap done around here! Every Monday I will show you my newest adventure, how it turned out (you will get to see the good, the bad and the ugly), and whether or not I recommend it to you! It will be anything from cleaning tips to crafts to large projects to recipes that entice me or anything else I find pin worthy. I will add a board on pinterest to keep track of everything that I have tried out just for easy access. If you aren’t following me on pinterest and want to check it out just look over on my sidebar and you will find the pinterest button.

So for my first project, I decided on recovering an old cardboard box to turn it into a cute and usable storage bin for Little Miss’s closet. I get one of these boxes every week with my Winder Farms delivery and am so excited to have a use for at least a few of them now.


100_0612


After about $5 in materials, a detailed set of instructions and 1.5 hours later, this is what our cardboard box now looks like! I love how it turned out and how simple it was to do. Amy at Positively Splendid gives a great tutorial on how to do it. She actually uses a diaper box and sews a fabric liner for the inside, but since these are going to be living in the top of N’s closet I decided a liner wasn’t necessary and attached a band of floral fabric around the top of the bin as a mock liner just for looks. You could totally go all out and sew the liner if it was going to be seen, this is just what worked for me!


100_0616


100_0618


All in all I thought this was an awesome pin. I now have a beautiful bin for $5 that I would have had to pay at least triple that (if I found a bargain!) for anywhere else! Now I’ve just got to finish three more to finish off the top of the closet!

I would love to hear about your adventures in pinland! Have you done anything that you love, or maybe something that you never want to think about again?!?


Linked up at:
Savvy Southern Style
Thrifty Decor Chick


Tuesday, October 2, 2012

Dining Table Facelift


This, my friends is a very sad dining table. It has been through a lot in it’s lifetime and in doing so has given me many cherished childhood memories. Yep, you guessed it! It’s my parents dining table and the one I grew up eating breakfast, lunch and dinner at, doing homework and crafts at, crying at and laughing at. As you can see it has been well used and well loved, and was in desperate need of a facelift.

DSC02552


The bones of the chairs were in a little better condition … but still not great! (The cushions, not so much!!!)

DSC02553


I actually did this project awhile ago. It was one of my firsts attempts at a big project and for sure my first try at doing a burn through to distress it. I think it turned out pretty good and is a huge improvement over what it was before!

100_0497


100_0500


100_0501


100_0507


100_0502

I love trying new things and have learned that the only way to know what I like best and what looks best is by trial and error. I can’t wait to try this technique on another piece of furniture!

Have you tried any new techniques lately? Had success … or even a fail? I would love to hear!


Linking up to:
Savvy Southern Style
Thrifty Decor Chick